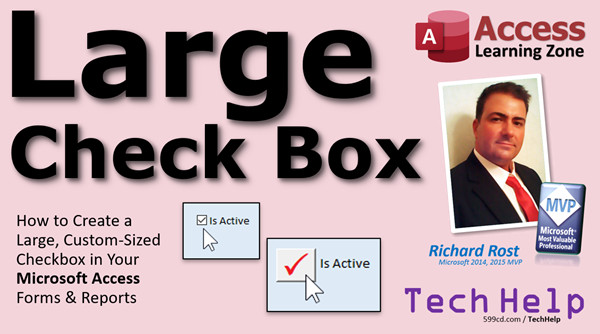
Large Check Box
By Richard Rost

 4 years ago
Large Custom Check Boxes in Microsoft Access
In this Microsoft Access tutorial, I am going to teach you how to create a larger, custom checkbox that looks a lot nicer than the default control. Hint: we'll actually be creating toggle buttons with a twist.
Kayla from Pine Bluff, Arkansas (a Platinum Member) asks: Is there any way to make check boxes larger? I have a few people working for me who are elderly and are having a difficult time with these tiny default check boxes.
Members
Members will learn how to create a single global function that will handle formatting all of the controls on a form at once.
Silver Members and up get access to view Extended Cut videos, when available. Gold Members can download the files from class plus get access to the Code Vault. If you're not a member, Join Today!
Recommended Course
 Links Links
Keywords
access 2016, access 2019, access 2021, access 365, microsoft access, ms access, ms access tutorial, #msaccess, #microsoftaccess, #help, #howto, #tutorial, #learn, #lesson, #training, #database, resize check box,custom check boxes, can you make a checkbox bigger, change size of checkbox, large check box, increase size of checkbox, toggle button, How do I make checkboxes bigger in access, How do I change the size of a checkbox
Intro In this video, I will show you how to create a large, custom-sized checkbox for your Microsoft Access forms and reports by using a toggle button instead of the standard checkbox control. We will walk through the process of binding the toggle button to your table field, updating its appearance, and using a little bit of VBA to display a check mark using the WingDings 2 font. This technique is especially helpful for users who may have difficulty clicking on the tiny default checkboxes in Access.Transcript Welcome to another TechHelp video brought to you by AccessLearningZone.com. I am your instructor, Richard Rost.
In today's video, I am going to show you how to create a large custom size checkbox in your Microsoft Access forms and reports. It can be as big as you want it to be.
Today's question comes from Kayla in Pine Bluff, Arkansas, one of my Platinum members. Kayla says, is there any way to make checkboxes larger? I have a few people working for me who are elderly and are having a difficult time with these tiny default checkboxes.
Kayla, you are not alone. Several people have asked me this, and unfortunately, there is not a whole lot you can do with the default checkbox. There is a default checkbox right there. It is tiny, and I can see how if you are elderly or hard of sight, or if you have arthritis, it is kind of hard to get the mouse right on that little guy. That is tough.
If you go to Design View, there is not a lot you can do with this thing. Let me move it over here. Let me just get rid of notes. Let's move it over here so there is room to work.
Now, you can move the label away from it and you can try to resize this guy, but what you do is just resize the check area. This whole area in here is where you can actually click and it will change the value of the control, but it does not change the size of that little teeny visible box.
In fact, if I save this now, if I close this and reopen it, I can click right out here and it still works. That might be a solution for someone who has a hard time getting the mouse over that tiny little box. They can instead click out here, but it does not change the fact that it is still tiny.
How do we get around that and make a bigger box that looks like this guy? How do we do that? Well, the key is we are not going to use a checkbox at all. We are going to use its relative, a toggle button.
This is a toggle button. See that? It is much, much bigger. You can make it as big as you want to. See that? These are toggle buttons. They look like checkboxes, a little check pops up, but they are bigger and easier to use.
So, how do we do this? That is what I am going to show you in this video.
Now, before we get started, I want you to go watch my Intro to VBA video. If you have not done any VBA programming at all, do not be scared. We only need a couple of lines of code put in the right spots, and that is what I am going to show you in this video. It is super easy to do, literally only a couple of lines of code. We just have to know what they are and where to put them.
So if you have never done any VBA before, go watch this. It is about 20 minutes long. It will teach you all the basics and then come back here and I will show you where to put these couple of lines of code.
Here I am in my TechHelp Free template. This is a free download off my website if you want to grab yourself a copy. You do not need to. You can use any database you want. This can be really simple.
Here is my checkbox. Let's get rid of this guy. Design view. Click and goodbye.
The first thing I am going to do is put a toggle button on here. Drop this guy down, find the toggle button controls right there. Toggle button, drop it right there.
Now, save it, close it, open it up, and take a look. That is what it does. It is not very useful.
We have to make it useful with a little teeny tiny bit of code and some formatting.
Open up the properties for it. Double-click on it. Now it is called Toggle30, first of all. We are going to change that.
Go to Control Source, drop this down, and we are going to bind this guy to the IsActive field. That means its value is now going to be bound to the IsActive field in the table, which is under the form. So, when I change the toggle button, it changes the value of IsActive.
And while we are at it, we are going to copy that and paste it right there to change the name of the box to IsActive as well. So, it is named IsActive and it is saving its value in the IsActive field. Same thing with FirstName. The name of the text box is FirstName and it is saving its value in the FirstName field in the table. That is what the Control Source does.
Now, as far as the way this thing looks, honestly, I particularly do not care for the new styles they added in Access, I think 2007. I just do not like the way they look.
So I am going to go to the Format tab here, and where it says Use Theme, I am going to change that to No. It puts it back to a standard old-school looking toggle button.
It looks a little boring, but I like these better. I do not know. I am going to go to the rounded look and they make them try to look all shiny and this is fine. If you like the styles, the themes, sure, stay with them. I do not care.
The thing with this is that it really does not lend itself to telling you what its value is just by looking at it. You can see it is up and down. There it is pressed down, there it is up.
So what we have to do is we have to change the caption of what is in this toggle button based on its value. Let's go back to Design View, click on this guy. Now, let's put a caption in here. Just put the letter X in there for now.
And I will make it bigger because the point is we want to make this large. Let's make it about 22 point. Bold it, make it red, whatever you want to do.
Next, let's go to the Event tab and we have to do something when the value of this button changes. We can put it in the On Click event. Personally, I prefer After Update. After Update happens any time the value that this thing is bound to changes.
Click the dot-dot-dot button. If you are asked what kind of builder you want, pick the Code Builder, and then this guy pops up, the VBA window. We are right inside the IsActive_AfterUpdate subroutine. Right inside of here is where the magic happens.
In here, I want to say, OK, if this value, if this field, IsActive, if it is true, then set the caption to X, otherwise make it blank.
So I am going to say: If IsActive, (now you can put =True in here, but that is assumed), you do not need to put that, just If IsActive and Access knows you mean If IsActive=True. Then what do I want to put in here? If it is true, I am going to say IsActive.Caption = "X" just like that. Otherwise, we use the word Else. Otherwise, IsActive.Caption = "" (an empty string). End If.
So, when I click on this box, if IsActive is now true, put an X in there. Otherwise, put nothing in there.
Save it, Control+S. Back over here, let's close the box and reopen it.
Now the reason why it did not appear to run the first time is because when the box opens, that code does not run. Right now, see the box is up because the value is false, but watch if I click on it. Now it is true and the X is there. The reason why is because we have to run that code also when the form opens or when you move from record to record. As I move from record to record, that code is not running and the X always stays in the box.
So there is one more place we have to put that code and that is in the form's On Current event. Go to the form properties, Events, On Current. This event runs when you move from record to record. That is the thing when the first record loads.
Now, I do not want to copy this whole thing. I could copy all this code and put that up there. Instead, I am just going to say, hey, why do you not call this guy? So copy that and paste it in there. The form Current event is going to say, hey, go run this code. The IsActive_AfterUpdate is going to come down here and run that stuff.
You can make your own subroutine, that is another way to do it too, but this is fine for now. In my full developer classes, I teach you all the proper things to do. But this works. This is good.
Save it. Close it. Open it back up again. Now, look, the button is down, the X is in there, and as I move from record to record, look at that. When we come across ones that are not checked, the button is not down and you get the X. Pretty nifty.
How about we put an actual check mark in there, not the letter X? Well, let's change this guy. Change this to a capital letter P. Why P? I will explain in a minute. Go into the code and also change this to a capital letter P.
Why are we using a capital P? Check this one out. Click on the box. Go up to Format. Drop down your fonts.
Now you should have a font, scroll way down, I want you to find WingDings 2. WingDings 2. This has been around since Windows 98, I think. WingDings has been around.
Click on that and look at that. The WingDings 2 symbol for the capital letter P is a check mark. Is that not neat? If you go into Microsoft Word, go into Insert Symbol, you can pull up the WingDings font and take a look at all the different ones that are in there. There are tons of them. I am not going to go over them now. If you really want to see me do a WingDings lesson, I will.
Let's change this so it is bigger, maybe a 48 point. There you go. Make the box fit the check mark. Perfect. That looks like a nice check box, does it not? If you do not want it red, that is fine. You can make it green or blue, whatever color you want. Let's go green. Green looks like that. Oh, yeah, that is neat. Now, let's go back to red.
Save it. Close it. Open it up. There you go. There is your big check box. Is that better for your elderly users? Hopefully.
If you want to add more check boxes to your form, because seldom do you ever have just one, you can do that. But you have to copy all that code. You have to take this guy, copy the After Update event. You have to copy this code in the next button. You have to make sure you copy that, or at least have different copies of that for each Form Current event.
So there is a lot of code to copy. Or, you can write a single global function that handles all of them on any form anywhere with one piece of code. That is what we are going to cover in the Extended Cut for the members.
Usually, I take the simple lesson and put it on steroids and that is what the Extended Cuts are. We are going to make one global function. We are going to make it called FormatToggleButtons, send it the name of a form, and it will go through and format all the toggle buttons on that form to the standard that you set. Make the check box, change the caption, whatever you want to do.
Here is my sample one. I should have shown you at the beginning of the video. And I do not have duplicating code everywhere for each one of these buttons.
So again, Silver members get access to all my extended cut videos. There are lots now, it is over 200 and something.
If you want to learn more about those VBA events, the AfterUpdate event and the OnCurrent event, I have got separate TechHelp videos on my website for those as well. You are going to learn a lot with just my free videos, so enjoy. Help yourself to them, that is what they are there for.
I hope you learned something in this video. Check out the Extended Cut, become a member today, and you will learn even more.
How do you become a member? Click on the Join button below the video. After you click the Join button, you will see a list of all the different membership levels that are available, each with its own special perks:
Silver members and up will get access to all of my extended cut TechHelp videos, one free beginner class each month, and more.
Gold members get access to download all of the sample databases that I build in my TechHelp videos, plus my Code Vault where I keep tons of different functions that I use. You will also get a higher priority if you decide to submit any TechHelp questions to me, and you will get one free expert class each month after you have finished the beginner series.
Platinum members get all the previous perks, plus even higher priority for TechHelp questions, access to all of my full beginner courses for every subject, and one free developer class each month after you have finished the expert classes.
These are the full-length courses found on my website, not just for Access, too. I also teach Word, Excel, Visual Basic, and lots more.
You can now become a Diamond Sponsor and have your name or company name listed on a sponsors page that will be shown in each video as long as you are a sponsor. You will get a shout out in the video, and a link to your website or product in the text below the video and on my website.
But do not worry, these free TechHelp videos are going to keep coming. As long as you keep watching them, I will keep making more, and they will always be free.Quiz Q1. What is the primary reason Kayla wanted larger checkboxes in Microsoft Access forms?
A. To match her company's branding
B. To make them visually more appealing
C. To help elderly users who struggle with small checkboxes
D. To fit more data in a small space
Q2. According to the video, what is the limitation with the default Access checkbox control?
A. Its visible box size cannot be increased
B. It cannot be bound to a field
C. It does not support mouse clicks
D. It cannot be deleted from the form
Q3. What alternative control does Richard suggest using to create a larger custom checkbox?
A. Option button
B. List box
C. Toggle button
D. Command button
Q4. To make the toggle button reflect changes in the data, which property must it be bound to?
A. Row Source
B. Control Source
C. Caption
D. Name
Q5. Why is it better to use the After Update event rather than the On Click event for the toggle button?
A. It triggers only when the database is saved
B. It only works for text fields
C. It runs every time the value changes, regardless of how the change occurs
D. It requires no VBA code
Q6. What simple VBA code logic does Richard use to display a symbol on the toggle button?
A. If statement to set the Caption based on value
B. Loop to check the value continuously
C. AutoFormat property adjustment
D. Default Value setting
Q7. Why does the code need to be placed in the form's On Current event as well?
A. To reset the button color every time
B. So the symbol updates when you move from record to record
C. To prevent the form from closing accidentally
D. To run a security check
Q8. Which font and character does Richard use to display a checkmark in the toggle button?
A. Arial, character X
B. Times New Roman, letter Q
C. WingDings 2, capital letter P
D. Calibri, number 4
Q9. How can you change the color or size of the checkmark in the toggle button?
A. You cannot change it once created
B. By adjusting the formatting properties like font color and size
C. Only by changing the table design
D. By using AutoFormat only
Q10. When adding multiple large checkboxes (toggle buttons) to the form, what extra step does Richard recommend for better code management?
A. Create a separate database for each checkbox
B. Use a single global function to handle all toggle buttons
C. Set different themes for each button
D. Avoid using VBA
Answers: 1-C; 2-A; 3-C; 4-B; 5-C; 6-A; 7-B; 8-C; 9-B; 10-B
DISCLAIMER: Quiz questions are AI generated. If you find any that are wrong, don't make sense, or aren't related to the video topic at hand, then please post a comment and let me know. Thanks.Summary Today's video from Access Learning Zone focuses on how to create a large, customizable checkbox in Microsoft Access forms and reports. I hear from many students, including Kayla who works with elderly users, that the default checkboxes in Access forms are a challenge because they're simply too small and hard to see or click for people with visual limitations or dexterity issues.
When looking at the default checkbox in Design View, there's not much you can do to increase its visible size. You can stretch the control area out, which makes it easier to click, but unfortunately the checkbox itself stays tiny. Allowing users to click anywhere in the larger control is a minor improvement, but the actual checkbox remains hard to see and unsatisfactory for users who need larger controls.
To overcome this, instead of the default checkbox, I recommend using a toggle button. Toggle buttons can be sized as large as you like, and they perform the same on-off action as a checkbox, making them much more accessible for users needing bigger controls.
Let me guide you through how to set this up. First, if you are not familiar with VBA, go watch my "Intro to VBA" video. The modification requires just a couple of simple lines of VBA code. If you are new to programming in Access, that video will give you all the foundation you need.
Assuming you are ready, open your database – any database you like, you do not have to use my sample template. In Design View, remove the small checkbox control and insert a toggle button in its place. Save your form and take a look: while you can now see and click the toggle button more easily, it does not yet show clear feedback for checked and unchecked states.
To make this toggle button actually function as a large checkbox, open its property sheet. Bind the control's source to the field you were originally using for your checkbox – for example, an "IsActive" field. Also, rename the control appropriately for clarity and maintainability, for example, to "IsActive".
As far as appearance goes, Access offers some fancy styles for toggle buttons, but I find the simple classic look works best for clarity, especially for users with accessibility needs. You can turn off the theme styling to use the basic style, or pick whichever you prefer.
Next, to make the toggle button behave visually like a checkbox, we need to set its caption dynamically based on its value. That way, when the value is true, you can show an "X" or a check mark, and when it's false, you leave it blank. Go into the button's event settings and use the AfterUpdate event. In the Code Builder, write a small VBA routine: if the toggle button's value is true, set its caption to an "X" (or another character you wish to use). If not, make the caption an empty string.
After putting in this VBA code, save your changes and test your form. You'll notice that the caption only updates after you click the button, not when you first open the form or switch records. This happens because the caption-setting code only runs in the AfterUpdate event. To fix this, you need to also call this code in the form's OnCurrent event, which fires every time a record is loaded or changed. You can do this by calling your AfterUpdate routine from the OnCurrent event. While a more advanced approach would be to separate your code into its own subroutine, for now calling the event handler directly is an effective solution.
Once all this is set up, you'll see that as you move from record to record or interact with the toggle button, its display reflects its value, providing large, easy-to-read visual feedback.
If you want to go further and use a proper check mark graphic instead of a plain "X", you can do that using fonts like WingDings 2. Change the caption to the letter "P", and set the font to WingDings 2, where the capital letter "P" shows as a check mark. You can use whatever font size and color you like. A large green check mark is often a good option for visibility and improvement over the small checkbox.
If your form requires multiple large checkboxes, you need to repeat this process for each instance, ensuring each toggle button has the right event code to update its caption based on its value. This can get repetitive and requires duplicate code for every toggle button.
To make things more efficient, in today's Extended Cut, I will teach you how to create a single global function called FormatToggleButtons. This function will take the name of a form and update all the toggle buttons on that form, applying whatever formatting and logic you want. This eliminates the need for duplicate code and speeds up maintenance when you have several large checkboxes in your applications.
If you would like to know more about the details of VBA events such as AfterUpdate and OnCurrent, I have separate TechHelp videos available on my website where you can go deeper into those topics.
I hope this video helps you create forms that are more accessible for all your users. If you want to watch the full video tutorial with step-by-step instructions on everything discussed here, you can find it on my website at the link below.
Live long and prosper, my friends.Topic List Creating a large custom checkbox using toggle buttons
Replacing standard checkboxes in Access forms
Binding a toggle button to a table field
Renaming toggle button controls for clarity
Removing modern themes from toggle buttons
Setting toggle button captions based on value
Formatting toggle buttons with larger fonts and colors
Using VBA to update toggle button captions dynamically
Handling AfterUpdate and OnCurrent events in forms
Using WingDings 2 font for check mark symbols
Resizing toggle buttons for accessibility
Synchronizing button appearance when navigating records |


