|
|
Free Lessons Courses Seminars |
TechHelp Fast Tips Templates |
Topic Index Forum ABCD |
|
||||||
|
Access Beginner 7 Navigation Forms, Custom Menus, Customer Lists Welcome to Access Beginner 7. In this course you will learn how to build and customize navigation forms in Microsoft Access to make your database easier to use, create a custom main menu form with command buttons for opening key forms and reports, and develop an alphabetical customer list form that allows you to open individual customer records. We will discuss the benefits and limitations of built-in navigation forms, walk through designing your own menu, and cover key formatting and organization techniques to improve the usability of your database. Lessons
Resources
New Feature
Lesson SummaryWelcome! Navigation & Customer Forms - Welcome to Access Beginner Level 7. In this course we will focus on making your database easier to navigate by using navigation forms, building a custom main menu form, and creating a customer list form. We will discuss the benefits and limitations of Access's built-in navigation forms, then walk through designing your own menu with labels and buttons, and finish by creating an alphabetical customer list that lets you open individual customer records. This course builds on Beginner Levels 1 through 6, and will help you improve the usability and organization of your Access database.
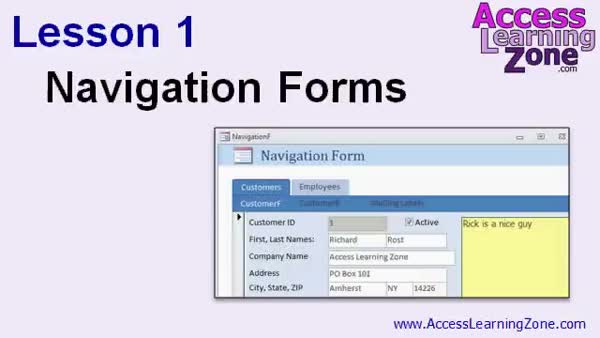
Lesson 1: Create & Use Navigation Forms - In Lesson 1, we will learn how to build navigation forms in Access to help users quickly move between forms and reports in a database. We will discuss different navigation options, including switchboards, navigation forms, and custom menu forms, and walk through creating basic and more complex navigation forms with tabs, renaming and rearranging them, and setting a navigation form to open automatically at startup. We will also cover limiting user access to certain database objects using navigation forms and touch briefly on nesting navigation forms and advanced customization options.
Lesson 2: Custom Main Menu with Buttons - In Lesson 2, we will start building a custom Main Menu Form from scratch in Microsoft Access. I will show you how to create a blank form not based on any table or query, and we will walk through adding command buttons using the wizard to open existing forms like Customer and Employee. We will also discuss how to set up your own close button, why you might want custom buttons for control and aesthetics, and address common issues such as the command button wizard not starting automatically.
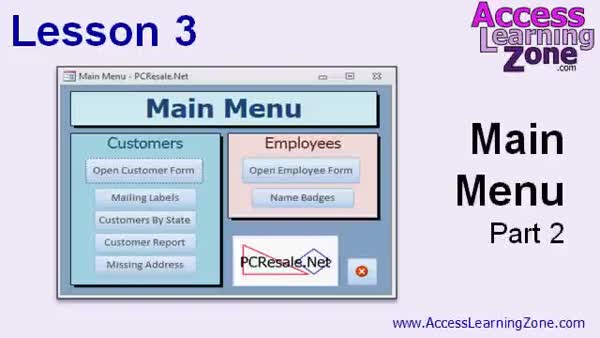
Lesson 3: Menu Colors, Groups & Buttons - In Lesson 3, we will take the Main Menu Form we built earlier and walk through formatting it to improve its appearance, including changing background colors, updating the form caption, and removing unnecessary elements like record selectors and scroll bars. I will also show you how to add labels for grouping buttons, format those labels, adjust their position, and use color coding to visually organize different sections such as Customers and Employees. We will add additional buttons for reports, demonstrate resizing and arranging groups, and discuss how you can further customize your main menu form to suit your needs.
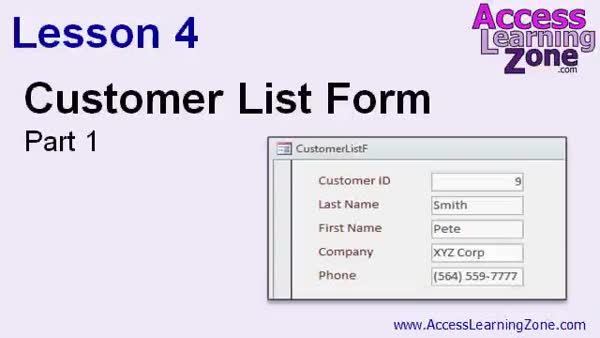
Lesson 4: Alphabetical Customer List Form - In Lesson 4, we will begin building a customer list form in Access that displays an alphabetical list of customers, allowing you to easily select and open a specific customer record. I will show you how to create a supporting query sorted by last and first name, then use that query as the record source for the form. You will learn how to design the form from scratch, set it to display as a continuous (multiple items) form, and adjust the fields and formatting. We will discuss some basic form design principles and look briefly at record sources and SQL.
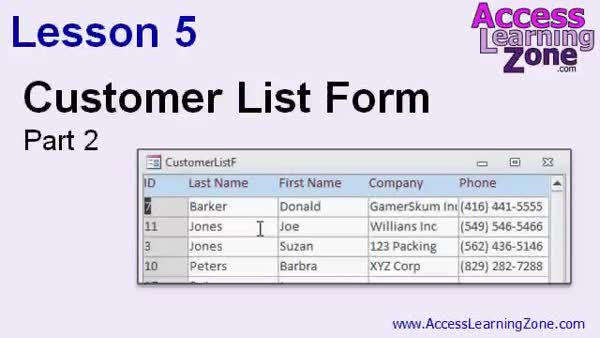
Lesson 5: Build a Customer List Form - In Lesson 5, we will finish setting up the customer list form, arranging fields into a row and column format, and using the form header so labels appear only once. I will show you how to add a command button that lets you open the customer form directly for the selected customer. We will also discuss customizing the layout, saving form dimensions, controlling navigation and editing permissions, and using transparent buttons as a trick to control user interaction with the customer list form. Finally, we update the main menu so the customer list opens from a button.
Lesson 6: Navigation, Menus & Lists - In this course we learned how to build navigation forms, including single-level and two-level tab navigation, set a navigation form as the start-up form, and hide the navigation pane in Access. We discussed the limitations of navigation forms and why it can be better to create custom menus with blank forms, labels, and command buttons, using the command button wizard to open other forms. We also covered various form formatting techniques and created a customer list form with a button to jump to specific records. Guidance on finding further resources and getting support was also provided.
NavigationKeywordsnavigation forms, main menu form, customer list form, command buttons, custom menu, continuous forms, open form button, form design, form formatting, group labels, row format, form header, hide navigation pane, start-up form, access control
TranscriptWelcome to Microsoft Access 2010 Beginner Level 7, brought to you by AccessLearningZone.com. I am your instructor, Richard Rost.Today we are going to work on getting around in our database and making our database more friendly to navigate. We are going to start by seeing how to use the built-in navigation forms, a tool that Access provides, to allow us to quickly and easily navigate between a couple of different forms or reports. Navigation forms, however, have their limitations. So next I will teach you how to build your own main menu form using labels and command buttons to open other forms. This is the best way to take full control over the navigation of your database. Finally, we will build a customer list form, which is a sorted, alphabetical list of customers. You can browse through them, click on any one of them, and then click on a button to go specifically to that customer's form. Again, this is a very powerful way to navigate through the records in your database. We will not be using a lot of automatic wizards in this lesson. You will be learning how to do most of this from scratch. I feel it gives you a better appreciation for Access to learn how to do this stuff manually. This class follows Access 2010 Beginner Level 6. If you have not taken my other classes 1 through 6, you should visit my website at AccessLearningZone.com and take those classes before starting this one. Today's class will be using Microsoft Access 2010. The lessons on the main menu and the customer list form will work in any version of Access. In fact, I used to teach those way back in my Access 2003 class. However, lesson 1 on navigation forms is unique to Access 2010. The good news is, if you are using an older version of Access, you really do not need the navigation forms. They are a quick tool that was added in Access 2010, but I think a custom main menu form is better, and that is why I spend a lot more time covering that. You are strongly encouraged to build the database that I build in class and follow along with me. However, if you are lazy like I am, you can download a copy of the database that I build in this class by visiting my website, AccessLearningZone.com/databases, and there you will find a link to download today's database. But you will get more out of this lesson if you build the database yourself. My courses are broken up into four groups: Beginner, Expert, Advanced, and Developer. My Beginner courses are for novice users who have little or no experience with Microsoft Access. They are designed to give you an overview of the basic features of Access and cover just what you need to know to be productive. The Expert classes are designed for more experienced users who are already comfortable with Access. Expert classes go into a lot more depth about each topic than the Beginner classes do and will cover more functions, features, tips, and techniques for power users. Once you have mastered the Expert classes, move up to the Advanced lessons. You will learn how to work with macros, automation, and many more advanced features that really add enhanced functionality and professionalism to your databases. Finally, my Developer Level courses are designed to teach you how to program in Visual Basic for Microsoft Access. This will allow you to create the most advanced databases possible and unlock the true potential of Microsoft Access. Each series is broken down into different numbered levels, starting with Level 1. Each subsequent level teaches you new and different topics in Microsoft Access, building on the lessons learned in the previous classes. Once you have finished all the Beginner classes, move up to the Expert series, then the Advanced, and finally the Developer lessons. In addition to my normal Access classes, I also have seminars designed to teach specific topics. Some of my seminars include building web-based databases, creating forms and reports that look like calendars, securing your database, working with images and attachments, writing work orders, tracking accounts payable, learning the SQL programming language, and lots more. You can find complete details on all these seminars and more on my website at AccessLearningZone.com. If you have questions about the topics covered in today's lessons, please feel free to post them in my student forums. If you are watching this course using my custom video player software or the online theater on my website, you should see the student forum for each lesson appear in a small window next to the class videos, as long as you have an active internet connection. Here you will see all of the questions that other students have asked as well as my responses to them and comments that other students may have made. I encourage you to read through these questions and answers as you start each lesson and feel free to post your own questions and comments as well. If you are not watching the lessons online, you can still visit the student forums later by visiting AccessLearningZone.com/forums. To get the most out of this course, I recommend that you sit back, relax, and watch each lesson completely through once without trying to do anything on your computer. Then, replay the lesson from the beginning and follow along with my examples. Actually create the same database that I make in the video, step by step. Do not try to apply what you are learning right now to other projects until you master the sample database from this class. If you get stuck or do not understand something, watch the video again from the beginning or tell me what is wrong in the student forum. Most importantly, keep an open mind. Access might seem intimidating at first, but once you get the hang of it, you will see that it is really easy to use. Now let's take a closer look at exactly what is covered in today's class. In lesson 1, we are going to learn how to build navigation forms to quickly move between the different objects in your database. In lesson 2, we are going to begin building our own custom main menu form. In lesson 3, we will take the simple main menu form that we built in lesson 2 and format it, add more buttons, and make it look really cool. In lesson 4, we are going to begin building a customer list form, which will be an alphabetical list of customers in a single form that we can click on to open up the full customer record. In lesson 5, we are going to finish up our customer list form, we are going to set it up in a row and column format, and we are going to add buttons so we can click on a customer and have it open up the customer form directly on that customer. IntroIn lesson 7 you will learn how to make your Microsoft Access 2010 databases easier to navigate by using navigation forms, building your own main menu form with command buttons, and creating a customer list form that lets you quickly jump to specific customer records. We will work from scratch without relying on wizards, and I will show you how to format, organize, and connect your forms for better user-friendliness. These techniques are useful for all Access users, and most will work in any recent version of Microsoft Access.QuizQ1. What is the main purpose of navigation forms in Access 2010?A. To quickly and easily move between multiple forms or reports B. To add security settings to a database C. To create advanced macros automatically D. To program in Visual Basic Q2. Why does the instructor focus on building a custom main menu form rather than just using built-in navigation forms? A. Because custom main menus offer more control and flexibility B. Because navigation forms are no longer available in Access 2010 C. Because main menu forms cannot have buttons or labels D. Because built-in navigation forms are only available in the Developer version Q3. What is a customer list form as described in this lesson? A. A form that displays customer records alphabetically and allows opening individual customer forms B. A query to delete customer records C. A chart showing customer sales totals D. A report on overdue payments Q4. What does the instructor recommend for getting the most out of the course? A. Watch each lesson entirely once and then rebuild the database following along B. Only watch the lessons without practicing C. Skip to the Developer level immediately D. Apply lessons directly to your own unrelated projects first Q5. What is unique about navigation forms in Access 2010 according to the video? A. They are a new feature added in Access 2010 B. They work only with web-based databases C. They are the best way to secure databases D. They can only be used with SQL programming Q6. What is suggested if you have not completed Access Beginner Levels 1-6? A. Go to AccessLearningZone.com and complete those classes first B. Start directly with level 7 C. Skip to Advanced courses D. Only focus on Developer topics Q7. What are the four course levels described in the video? A. Beginner, Expert, Advanced, Developer B. Novice, Intermediate, Professional, Master C. Student, Teacher, Administrator, Guest D. Basic, Intermediate, Advanced, Enterprise Q8. What should you do if you have questions during the course? A. Post them in the student forums on AccessLearningZone.com B. Email Microsoft support directly C. Wait until the end of the course to ask questions D. Search for answers only on unrelated forums Q9. What is the best way to navigate records in your database, as emphasized in the lesson? A. By building custom navigation features such as a main menu and customer list form B. By using only built-in wizards C. By creating only reports D. By using unrelated software Q10. How are the different course levels organized? A. Each level builds on the previous one, starting from Level 1 onward B. All levels teach the same material in a different order C. Advanced comes before Beginner D. Developer classes are not related to Access Answers: 1-A; 2-A; 3-A; 4-A; 5-A; 6-A; 7-A; 8-A; 9-A; 10-A DISCLAIMER: Quiz questions are AI generated. If you find any that are wrong, don't make sense, or aren't related to the video topic at hand, then please post a comment and let me know. Thanks. SummaryToday's video from Access Learning Zone focuses on making your Microsoft Access 2010 database easier to navigate. I will guide you through several important techniques to improve how you and your users get around inside your database.First, we will look at navigation forms, which are built-in features in Access that help you quickly switch between different forms or reports in your database. While they are handy and easy to set up, navigation forms do have certain limitations. Because of this, I will show you how to create your own main menu form using labels and command buttons. This method gives you total control over the navigation experience and is the best way to customize how users interact with your system. Next, we will build a customer list form. This form displays your customers in a sorted, alphabetical list so that you can easily browse through them. With this list, you will be able to select a customer and jump directly to that customer's detailed form using a button. This technique is especially useful as your database grows, as it lets you access specific records quickly without scrolling through pages of data. Throughout these lessons, we will be doing most of the work without relying on Access's automatic wizards. I believe that taking the time to learn how to build these forms by hand gives you a deeper understanding and appreciation for what Access can do. If you have not watched my earlier Beginner Level classes 1 through 6, I encourage you to do so before starting this lesson. Each class builds on the previous one, so it is important to go through them in order to get the most benefit. While today's lessons feature Access 2010, most of what we cover about the main menu and customer list forms works in every version of Access, even as far back as Access 2003. The only exception is the lesson on navigation forms, since those are only available in Access 2010 and later. Still, you are not missing out on much if you use an older version, as I recommend creating a custom menu form anyway. I highly recommend building the database along with me as you watch. Following along step by step is the best way to master the material. However, you do have the option to download a copy of the complete database from my website if you want to save time, but you will certainly benefit more from building it yourself. To give you an idea of the course structure, my lessons are organized into Beginner, Expert, Advanced, and Developer levels. The Beginner series gets newcomers up to speed with the essential features of Access so you can be productive right away. The Expert level is for those who already understand the basics and want a deeper look at more features, tips, and useful techniques. Once comfortable at the Expert level, you can move to the Advanced series, which covers topics like macros, automation, and more features that take your databases to a professional level. Developer lessons are meant for those who want to program databases using Visual Basic, opening up even greater capabilities. Each group of classes is divided into numbered levels, with every new level building directly on the topics covered before it. Having a solid grasp of one series makes the next one easier and more valuable. I also offer seminars on a range of specific topics, such as creating web-based databases, designing calendar-style forms and reports, database security, handling images and attachments, writing work orders, managing accounts payable, SQL programming, and much more. You can find details on these specialized sessions on my website. If you have any questions as you go through today's lessons, you are welcome to post them in the student forums. If you use my video player or the online theater, these forums appear right next to the class video, letting you see questions and answers from other students. This is a great resource for clearing up confusion or seeing different approaches to the same problems. Even if you are not watching online, you can visit the forums through my website. To get the most out of this course, I recommend watching each lesson all the way through the first time without trying to follow along. After that, watch again and build the sample database step by step, just as I do in the video. Avoid jumping right into applying the ideas to your own projects until you have recreated the class database. If you hit a snag or something is unclear, re-watch the section or ask for help in the forums. Above all, keep an open mind. Access can look intimidating at first, but once you have some experience, you will find it much easier to use. Now, let's talk about the structure of today's lessons. In lesson 1, you will learn about navigation forms for moving between different objects in your database. Lesson 2 covers building a custom main menu form from scratch. In lesson 3, we will improve that main menu, adding formatting, more buttons, and enhancements to make it visually appealing. Lesson 4 focuses on creating the customer list form, where you can browse customers in alphabetical order. Finally, in lesson 5, we will finish the customer list, display it in a row and column format, and add the ability to open any customer's record directly from the list. You can find a complete video tutorial with step-by-step instructions on everything discussed here on my website at the link below. Live long and prosper, my friends. Topic ListUsing navigation forms to move between database objectsBuilding a custom main menu form from scratch Formatting the main menu form and adding buttons Creating a customer list form with alphabetical sorting Setting up the customer list form in row and column format Adding buttons to open customer records from the list Primary Topicsnavigation forms, custom main menu form, customer list form, form navigation, Access 2010 interfaceSecondary Topicsform formatting, command buttons, using labels, record browsing, version compatibility |
||||||||||||||||||||||||||||||||||||||||||||||||||||||||||||||||||||||||||||||||||||||||||
|
| |||
| Keywords: navigation forms, main menu form, customer list form, command buttons, custom menu, continuous forms, open form button, form design, form formatting, group labels, row format, form header, hide navigation pane, start-up form, access control PermaLink Microsoft Access Beginner 7 |